.jpg)
In How development feasibilities can help with construction and land loans, we discussed the concept behind creating development feasibility or pro forma. It's possible you already used spreadsheets before reading this blog, or you're a pro at Excel. With Aprao you can model construction and land loans in just a few minutes.
Today, we dive right into the steps to creating a feasibility using Aprao when considering construction and land loans. Click Get started for free on the top right corner and follow along.
In our example, Peter plans to purchase a piece of 'shovel-ready' land and build a custom residence on it. A suitable custom home builder has already been contacted with design and construction plans in place. The only thing Peter needs now is a construction and land loan because he lacks all the cash needed at the moment and does not wish to use all his savings on this project.
Unlike applying for a mortgage when buying an existing house, Peter needs to provide detailed specifications of the house that he intends to build. He also needs to provide a financial budget to show the loan drawdown that he will need each month. The housebuilder and Peter decide to create the budget in Aprao since it already has a self-generated cash flow model.
Create new project
The first thing Peter does in Aprao is to create a new project. Peter enters the site address and names the project 'Peter's housebuilding project.'
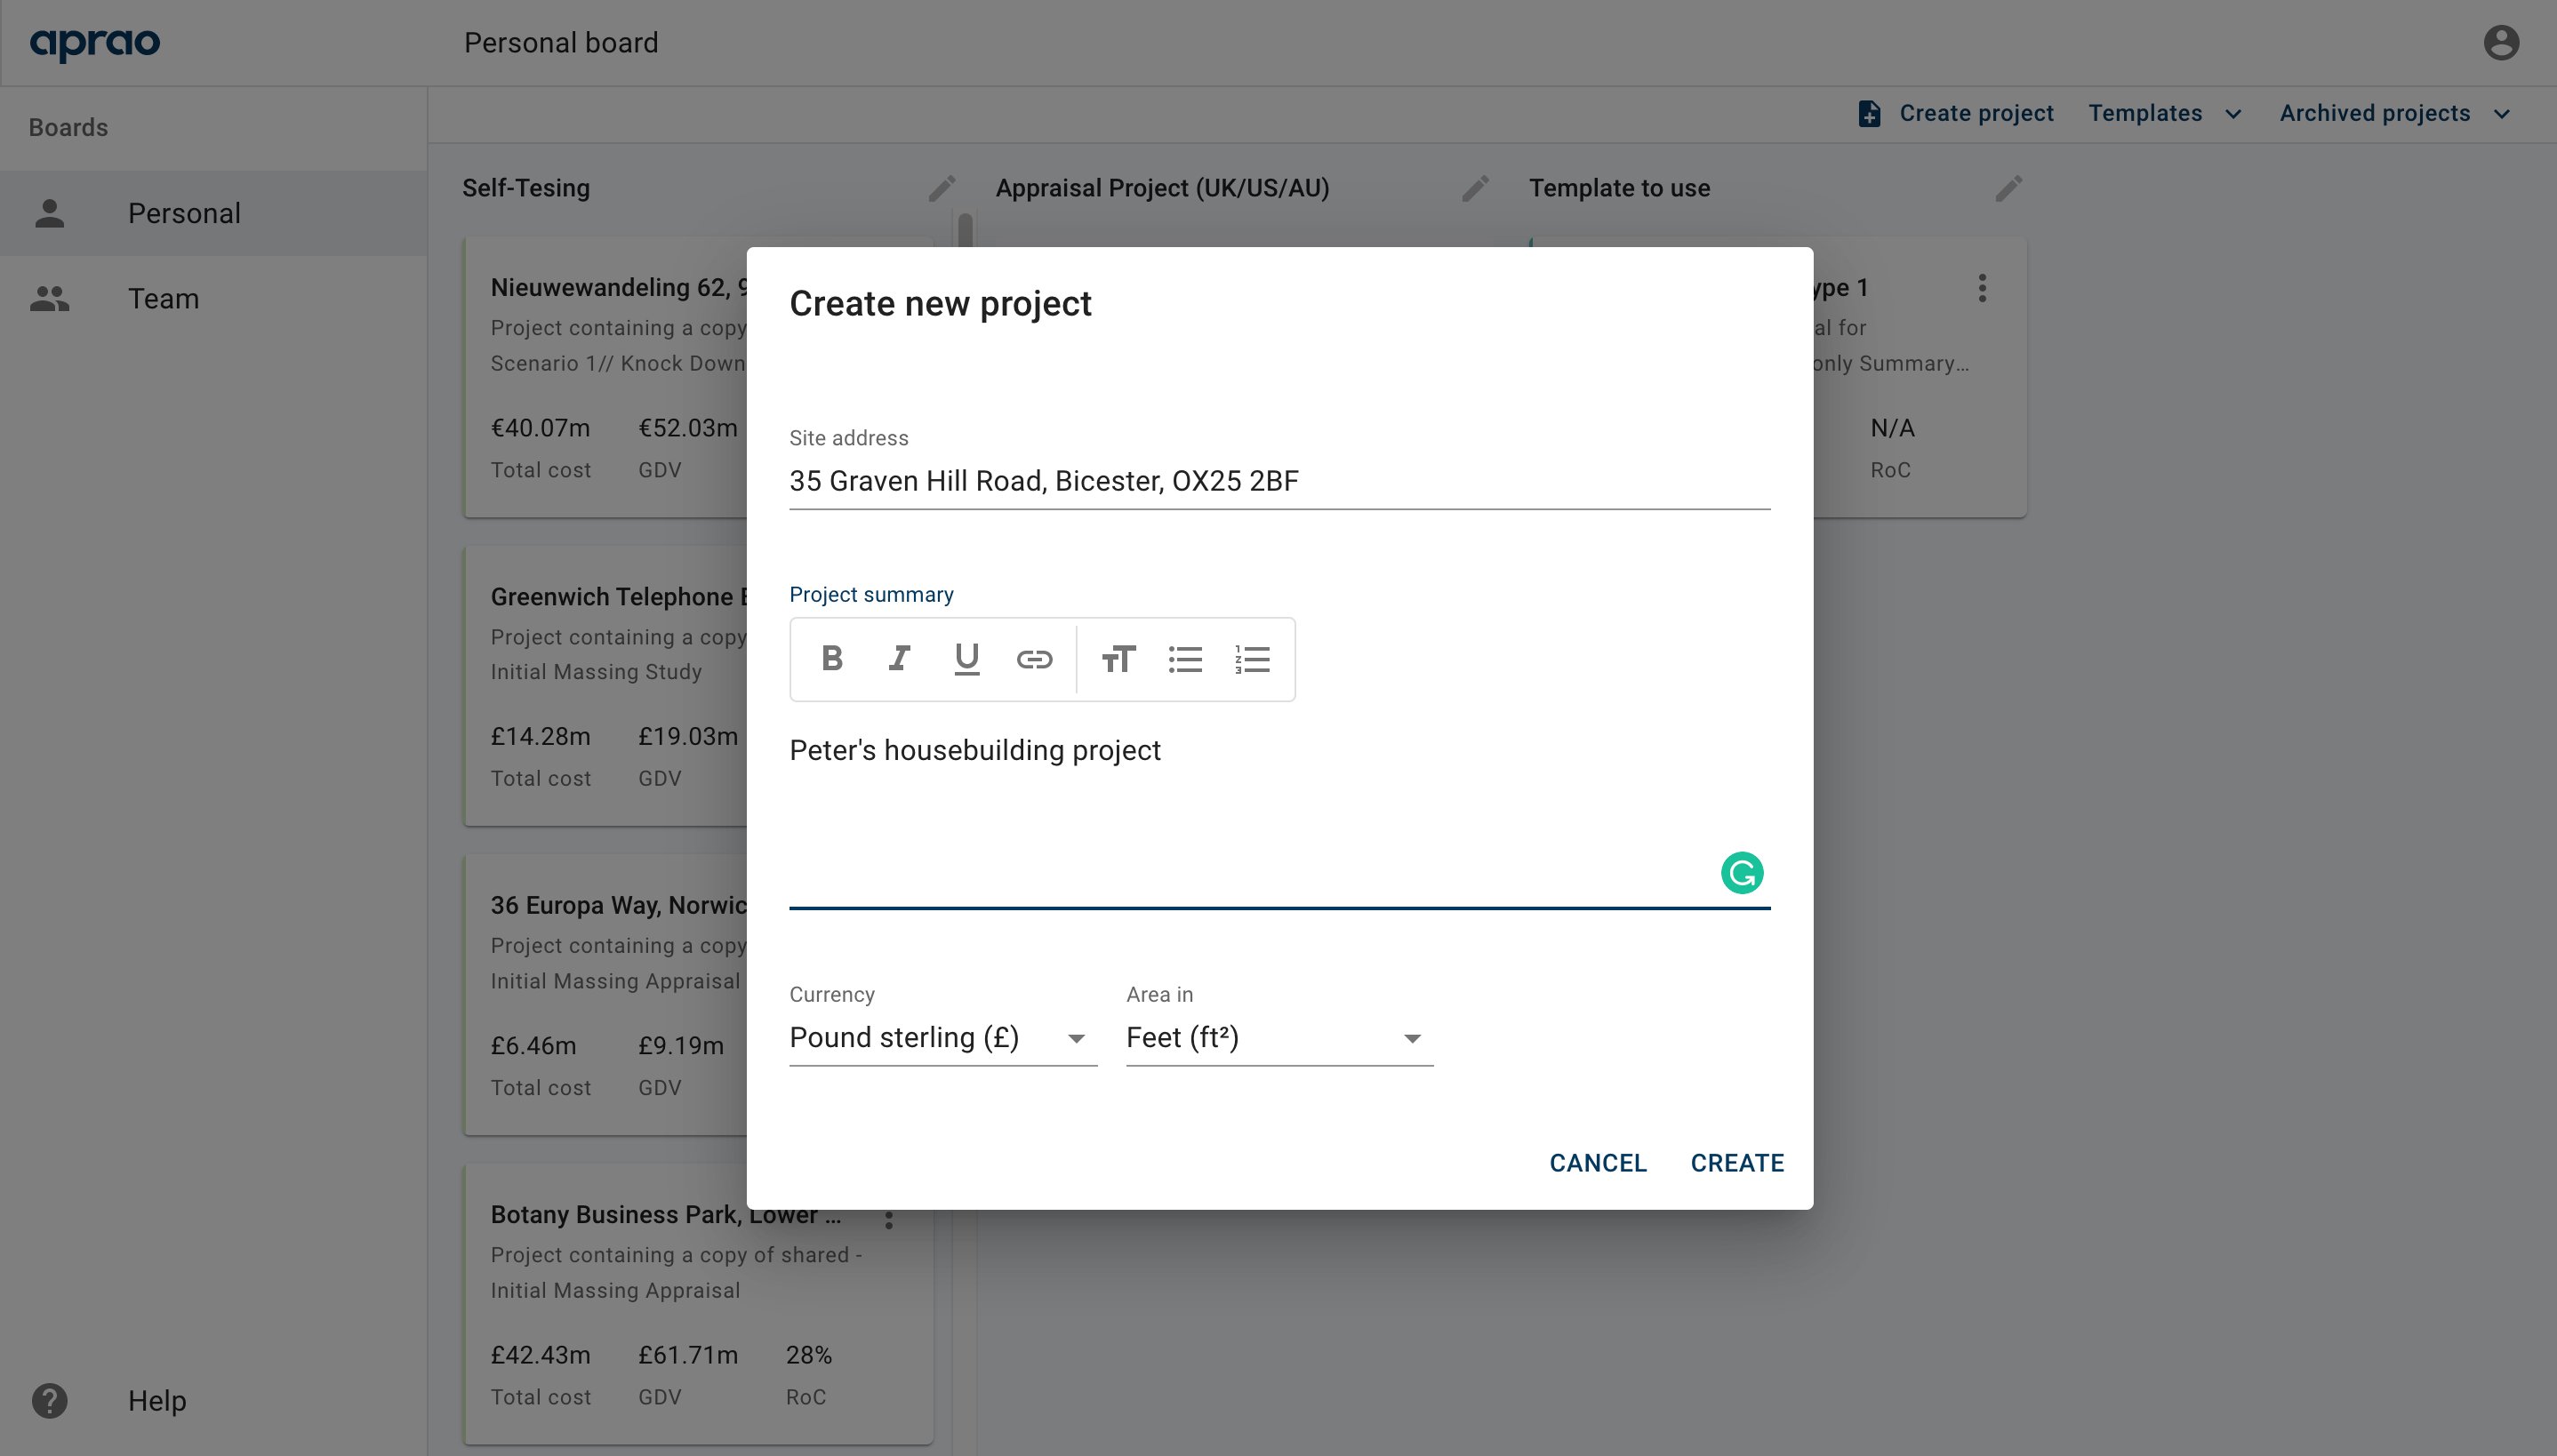
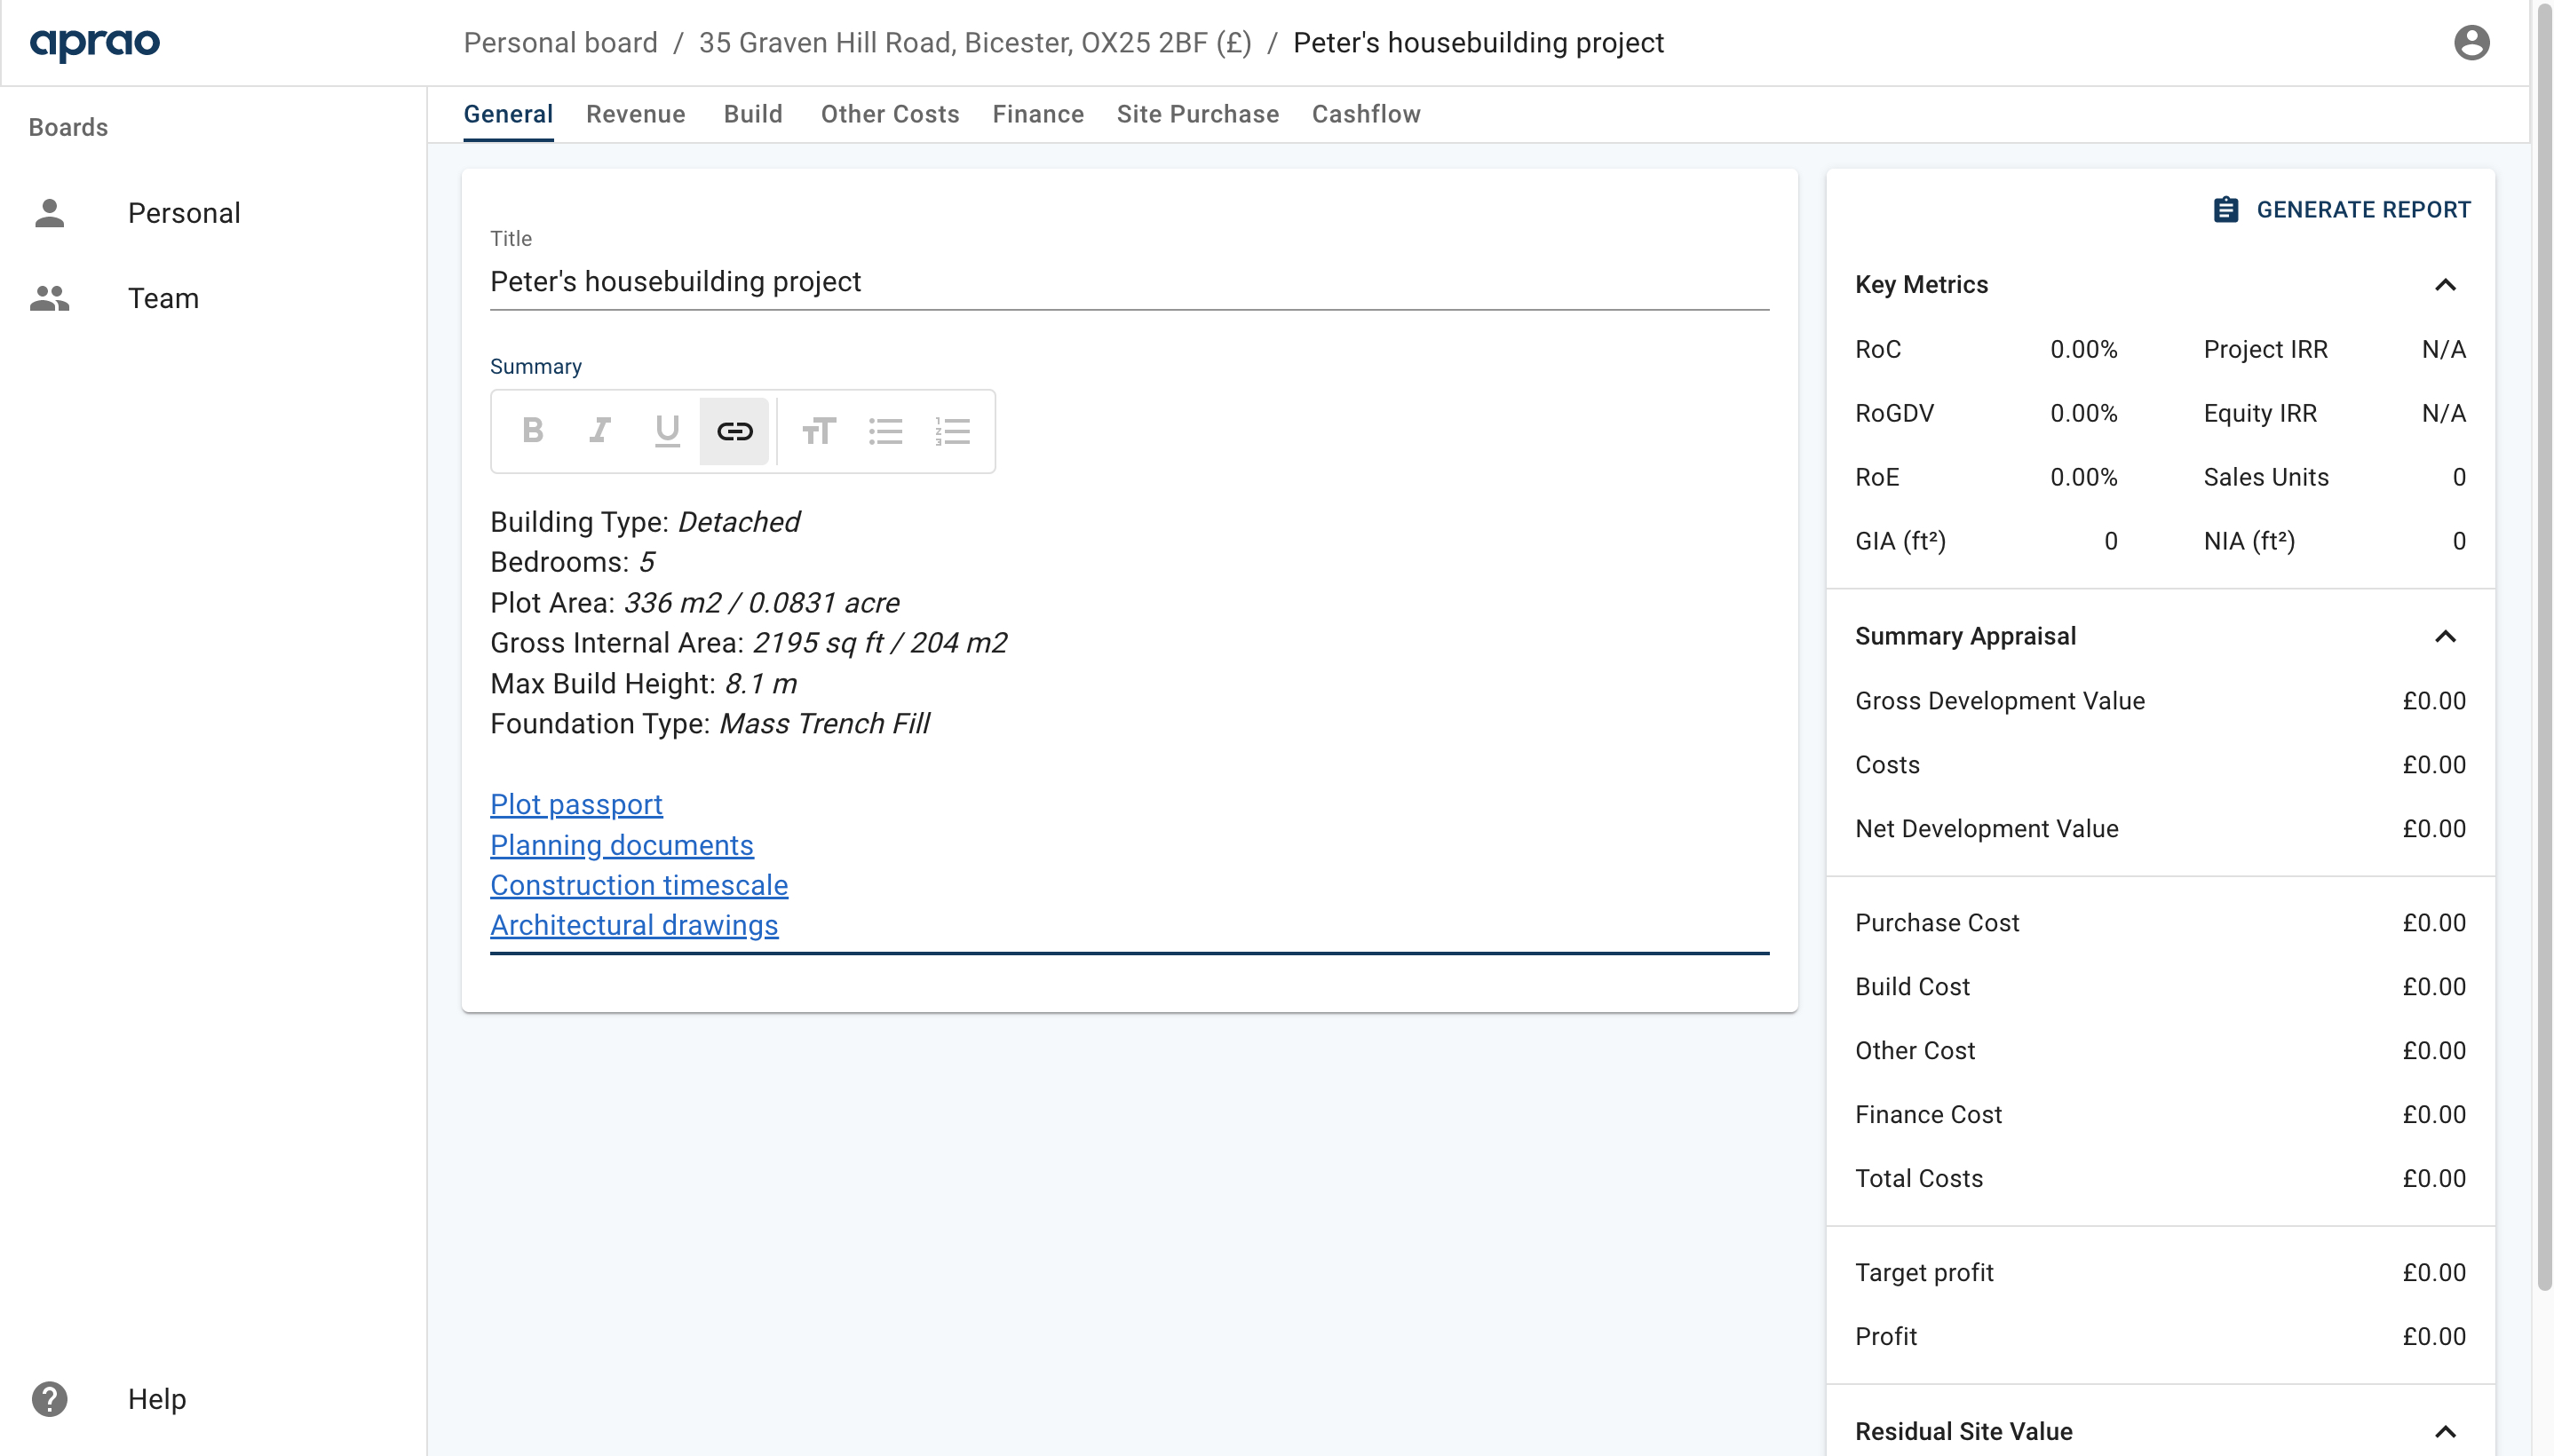
Then he adds a new feasibility and inputs different details onto the summary page. He includes a short description of his project and links several documents required by the lender (planning documents, construction timescale, architectural drawings etc.) into one place.
Revenue and Build Costs
Next, Peter goes through the Revenue, Build, and Other Costs tabs. He entered the estimated market value of the house that is to be built, the build cost quoted by the housebuilder, and some bits and pieces of costs that will incur throughout the project.
Finance
Now, Peter moves on to the Finance tab. He enters the loan amount (70% of cost) and a 5% interest rate that he expects from the lender. He can always go back to this and change the number whenever his offer from the lender changes.
Under Payout, he selects Serviced and Drawn Balance, which is how construction and land loans operate. Under Calculation, he chooses Cashflow and leaves it there for now, since the cash flow will be created in the next step. He enters other fees related to the loan and this section is completed.
He then slightly modifies the numbers he entered earlier during the feasibility. Because Aprao is a dynamic tool, the changes are immediately reflected in the summary table on the right. This allows Peter to easily move on to other tabs without having to make any manual changes.
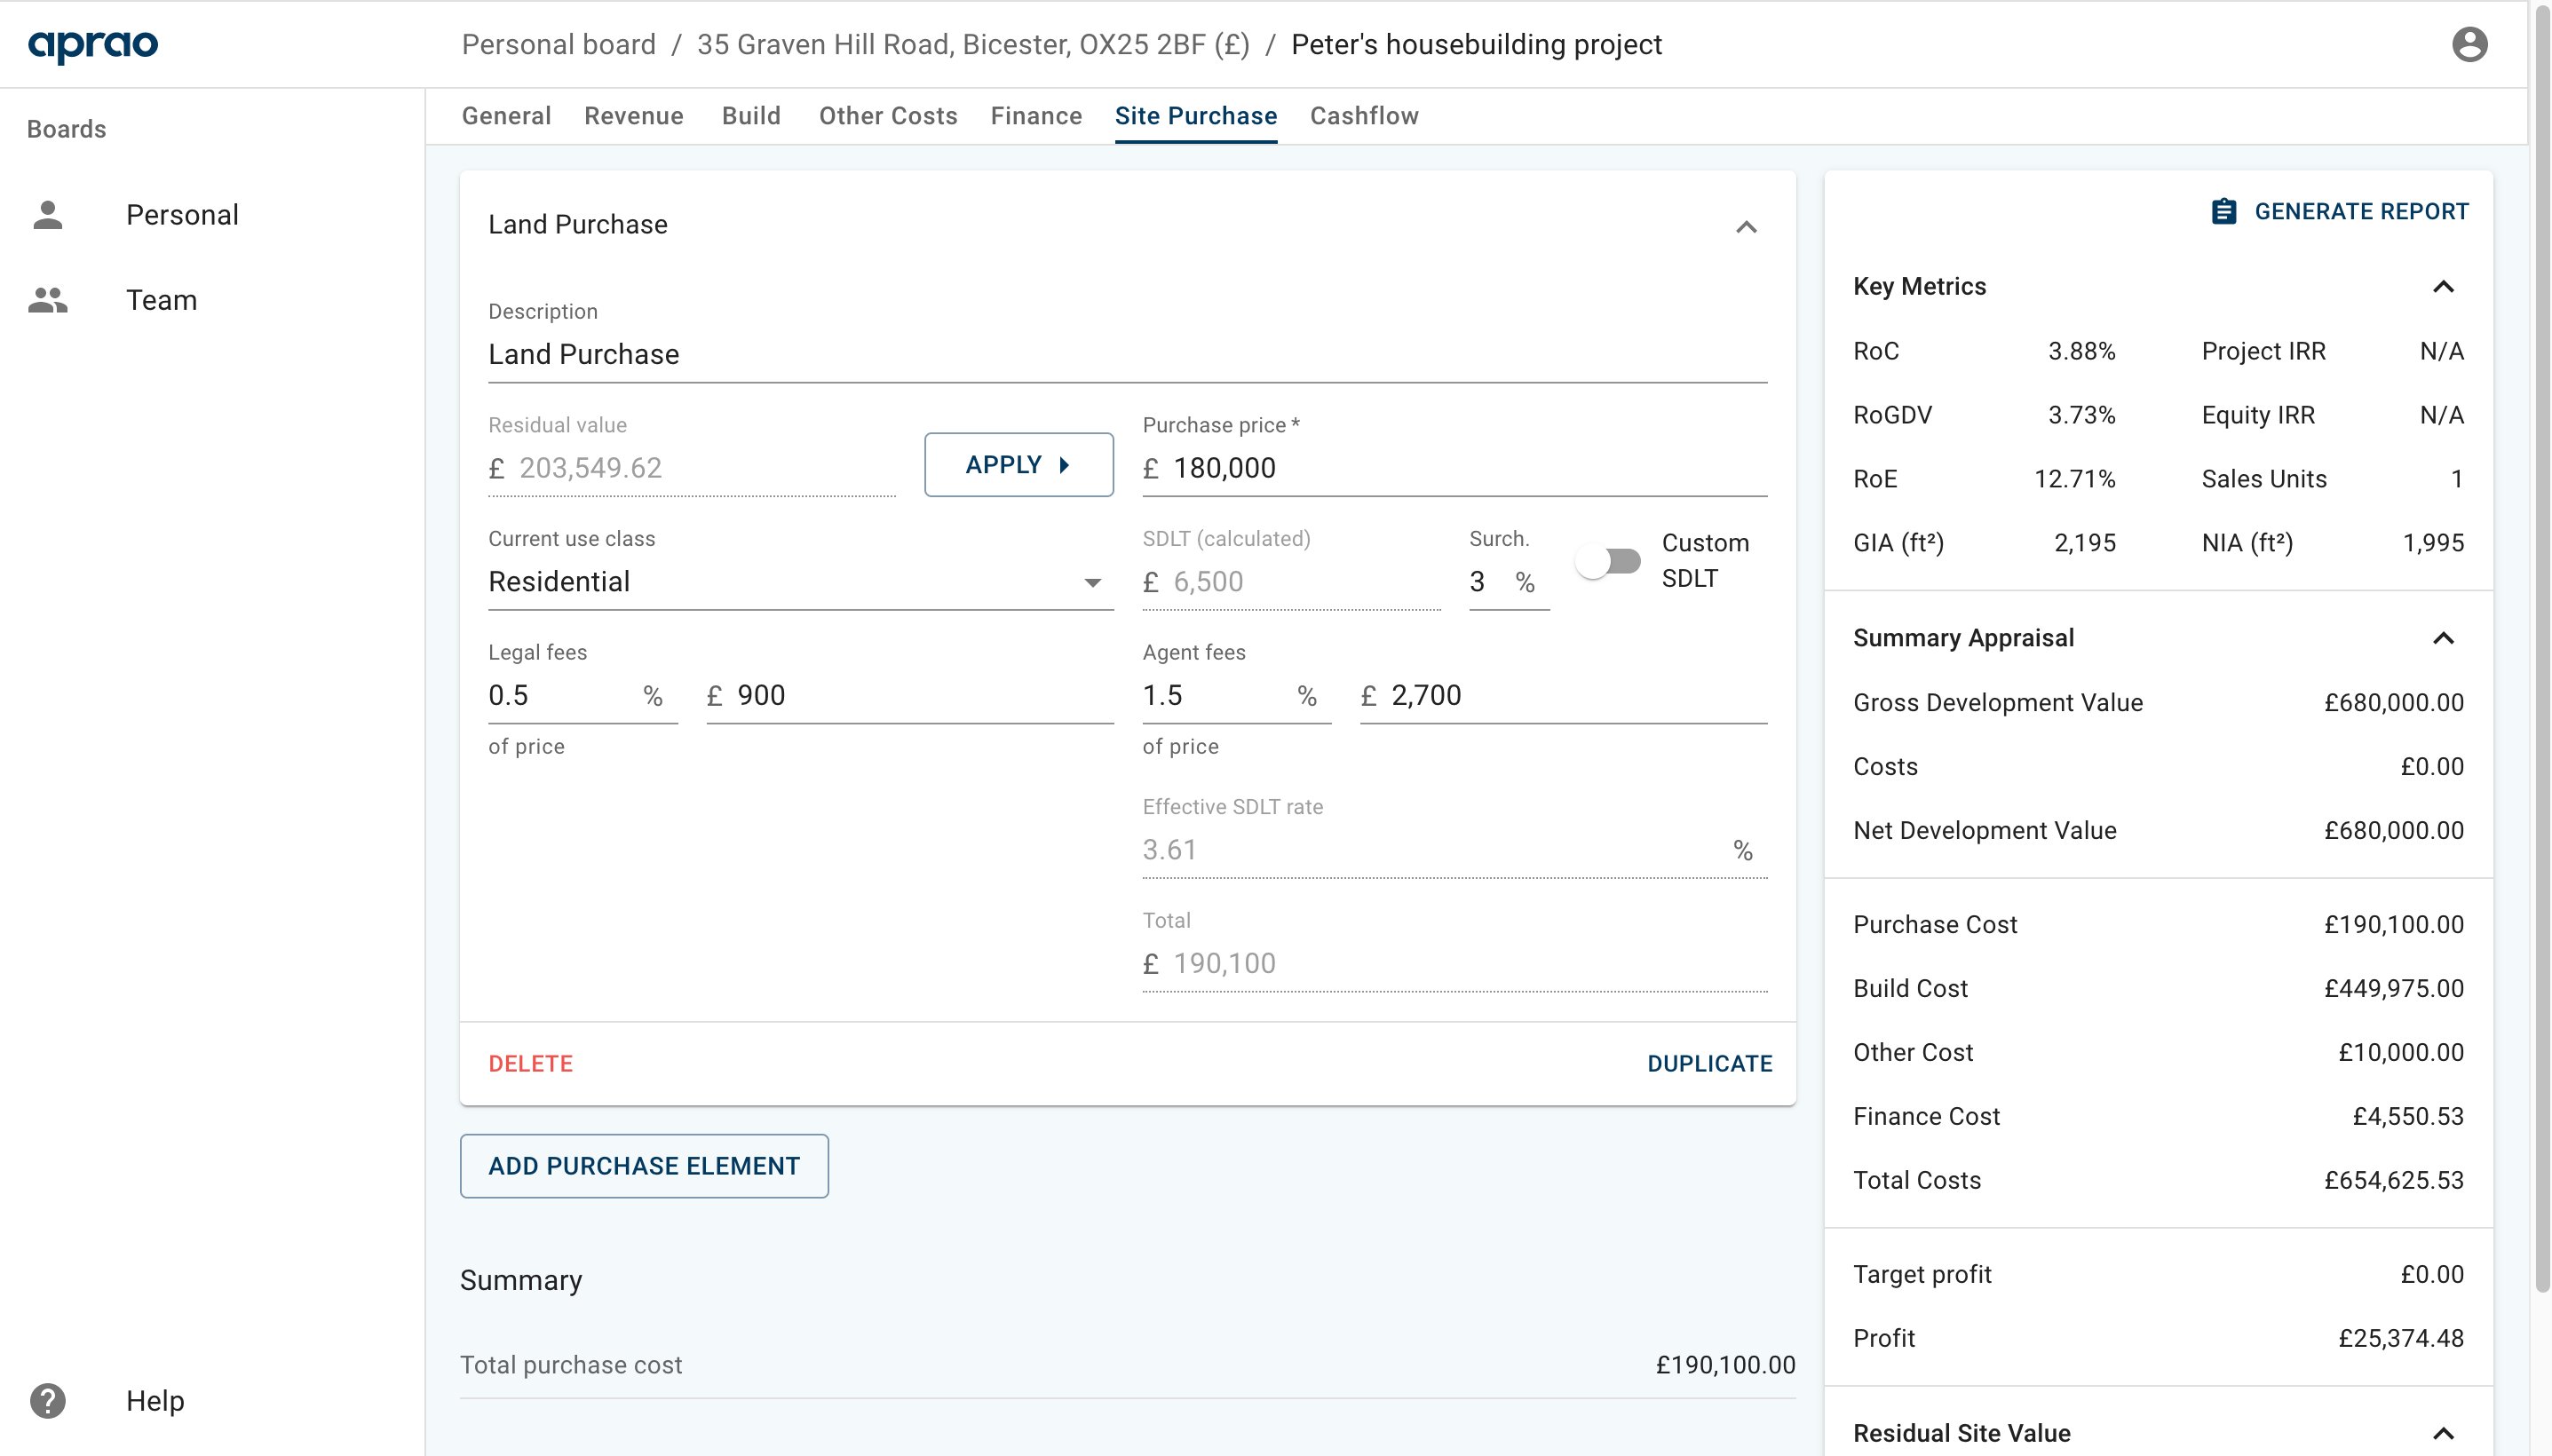
The next step is Site Purchase. Peter enters the price of the land that he is going to buy along with the fees involved. The residual value is not needed in his situation, so this section is completed as well. At this stage, Peter can already have a quick glance at the various costs on the Summary feasibility table on the right-hand side.
Cashflow
The final and the most important piece of the puzzle is the cash flow that is used to determine the loan drawdown each month. Peter goes to the Cashflow tabs and sees that there is a left column with numbers that are already pre-populated. These are the numbers he inputted in the previous steps. Some cells are filled out in orange. In other words, Peter can decide the timing of these items throughout the project.
Peter and the housebuilder estimate that the project will take 12 months to complete. Therefore, the Revenue Balance will be shown in the 12th-month column of the cash flow. For that, enter 12 under start and 1 under length. This is the start of the month, which is the 12th month, and 1 is the total number of months the revenue will be incurred. With a click of the tick symbol, Aprao is able to create an entire row of cashflow cells with the correct figure entered in the 12th-month cell. At the same time, the orange color will disappear in the cell saying 0 units left of 1 unit. This means Peter has completed the cash flow of this row and there is no missed number that he forgets to put in.
The process is basically the same for other rows. In the Site Purchase section, all the payments related to site purchase will happen in the first month. Hence, in the Land Purchase row, enter 1 under month and enter 100 under %, then click the + symbol to apply it to the cash flow. They mean the land cost will be incurred in the first month and it will be paid 100% within the first month. In other cases, users can enter a fixed amount of cost under the amount and split the total figure.
As long as you have inputted the total amount correctly throughout the row, the orange color in the cell will disappear and indicating that you've completed the cash flow of this row. Peter does the same for SDLT, Legal Fees and Agent Fees.
Build costs
Moving on to Build costs, Peter and the housebuilder estimate that build costs will start to be incurred in the second month, and will last 11 months. Therefore, in the Custom House Builder Cost row, he enters 2 under start, and 11 under length.
When Peter clicks the tick symbol, he is able to choose either a straight line or S-curve distribution when splitting the amount across the 11-month period.
For build costs, the common assumption is that the cost will be split into an S-curve along the period, with more cash needed in the middle than at the start and the end of the period. If you want to just average the cost across the time period, choose straight.
Peter quickly completed the cash flow model after completing all the rows and identifying no orange cells. Peter doesn't need to format cells, enter formulas or check each cell for errors.
Exporting the spreadsheets & generating reports
In the Finance section of the cash flow, Aprao is able to directly show the loan drawdown needed each month automatically. If you want to view this cash flow model using excel, you can simply click EXPORT on the right upper corner and download the excel spreadsheet.
Now, Peter goes back to the Finance tab and under Interest (cashflow), he can immediately see the cost of the interest calculated according to the cash flow model. And the figures on the right side of the summary table are slightly adjusted according to the cash flow.
Now, you have a ready-to-submit development feasibility analysis/Pro-forma. Click Generate Report and download the pdf file. For an online view of the feasibility, go back to the Aprao board and choose feasibility to share. The link shared will look like this:
The financial feasibilities created using Aprao like the one created by Peter, are well-recognized by lenders across the market as their preferred feasibility format.
Interested in modelling construction and land loans in Aprao for yourself? Get started with a 14 day free trial here.